Wednesday 29 March 2017

Black Smokey Eye Makeup Look

Hi everyone, So as promised last week, for today I’ll be showing you how I created this smokey eye. I really love this look, it’s so bold and edgy. For today I will be skipping the foundation routine and focusing on the eyes.


So for today’s look I used the OPV ‘Gorgeous’ Palette. Hereunder you’ll find a picture of the palette with the numbers on top of the shades indicating which shades I used one after the other. So as always I first conceal my eyes to remove any discolouration and have a clean base. For that I used the Maybelline Instant age rewind concealer. Since I have oily eyelids I ALWAYS set them with a loose powder (transparent) or else a nude eyeshadow. It’s a great tip for not having your eyelids creasing and also having a good base for your eyeshadow. Setting your concealer will also help when blending your eyeshadow. Today in this look, it’s all about blending, blending and blending! We do not want any harsh lines showing.


So the first shade is called the transition shade. A transition shade is about a shade or two darker than your own skintone which this will helps to merge colours together. After applying my transition shade I then went on a more darker colour than the transition shade to intensify the look. With a tapered blending blush I took a burnt orange kind of colour to my crease. Using this brush helps me to define more the crease. Some may think that a smokey eye is really hard to do, but in my opinion it’s really easy. All you need is patience to blend! Which comes to this. On the lid, I apply gel liner. For this look, I used the BH cosmetics gel liner in the shade black. Applying it with a small concealer brush, I then set it with a black eyeshadow which you’ll find it in this palette as well. Here’s where all the hard blending begins. You will need to make sure that the black and the orange crease blends together and not having any lines showing. To make sure everything is blended nicely, I take around 10 minutes for both eyes to blend them well. For the under-eyes, I took the same orange colour and blend it out on the lower lash line.Lastly, taking a light colour for the inner corners for a light highlight. Basically, that’s all.You can also add some glitters to the look but since I’ve recently started posting make up looks, I wanted to start with simple looks and then building them up. I will be using glitters in the upcoming posts for sure! Promise!! Any looks like these will forever be my favourite looks, cause there isn’t any winged liner involved, and you’ll know for sure how the outcome will turn out to be!


I hope you learnt some new tips from this post. Thank you for your constant support! Lots of love, Nicole x x x OPV Gorgeous Palette

Saturday 25 March 2017

Monochrome Outfits

Hi everyone! Saturday is finally here and so is the weekend 😄 I've been so busy these last couple of days that I'm just excited that the weekend is finally here - it's like the time that I get my life together again for another week! I know I promised you I would get up a travel post this week but unfortunately I had had some unexpected things that came up and I have to postpone it but I'm trying my best to get it up ASAP!

For today's post I decided to share with you 2 Monochrome Outfit Ideas. I know that Spring is upon us and some people start switching to lighter colours but I believe that Monochrome are all-year-round type of colours and that's why I decided to share it with you! I switched things up a bit by trying to incorporate some colours with the monochrome look as you will see in the photos very soon. Let me know what you think of them! All photos were taken by the lovely Sabrina Sacco and all the details to the outfits will be listed at the end of the post.


Outfit no.1


You've seen some of the pieces I am wearing in previous posts but a couple of weeks ago I tried on this outfit to go for tea with my friends and I really loved how it turned out. I had bought this black button-up skirt for summer-time but I really wanted to wear it during this time of the year and I was hesitant on whether it would look good with a pair of see-through black tights. In my opinion, it looks pretty good! So for this outfit, I wore my black button-up skirt with my black see-through tights. I wore my cropped long-sleeved maroon sweater over the skirt and to make sure that I won't have to pay attention to my tummy being seen (I hate that!) I wore a black tank top underneath it (you might see it in some of the photos!). To finish this outfit off .. you know it! I threw on my FAVOURITE black leather jacket and my black booties.

Oh, and I met Roy too - he wanted to be in the blog so we posed for some photos together! We had a chat too and he told me he loved my outfit 😉


Outfit no.2


For this outfit I decided to do something more comfy. Therefore I paired my black jeans with a simple black sweater. I love this sweater because it's short from the front and long at the back, thus making it slightly different than regular sweaters. You can throw on a jacket on top of the sweater, whether it is black or coloured. For the shoes I went for my mustard boots to add some colour to the look.


That's it for today! Hope you enjoyed it, stay tuned for more exciting posts coming up next week!

Love,
Deborah X

Details:
Outfit 1:
Leather Jacket - Stradivarius
Maroon Cropped Sweater - Stradivarius
Black Button Up Skirt - Forever 21
Black Booties - H&M

Outfit 2:
Black Sweater - 
H&M
Black Jeans - Stradivarius
Mustard Boots - H&M

Wednesday 22 March 2017

Spring Makeup Look using Drugstore Products

Hi everyone - Nicole here! So since Spring is here I just wanted to create a simple spring appropriate make up look. My posts will be mostly about make up looks and reviews on products. I will also be posting on Wednesdays. Each week I will be posting different looks; either bold or simple looks. Also, if you have any ideas on any make up looks that you’d want me to do please do comment down below! For this look I will be using ONLY drugstore products.

For today, as I already said I will be doing a very simple make up look. Great for any make up beginners, for school or even for work. As always I start with a moisturized face and I make sure I prime my face. I then start with foundation which for today I will be using L’Oreal Infallible Matte Foundation. As I said in the previous post, I really do love this foundation and it stays on for so so long! Moreover, I went in using my Rimmel Perfect Match Concealer in the shade Ivory & then setting my under eyes with the Rimmel Loose Powder in the shade Transparent. For contouring I usually use my NYX Contour Palette but today I decided to go for the Essence Bronzer for darker skin. For blush, I used the Essence Matte Touch Blush in the shade Berry Me Up. For highlighting I used the Carli Bybel's palette highlighter. This is a very affordable palette; it was actually my first eyeshadow palette and it’s very good for those who have just started experimenting with makeup. Highly recommended!
Moving on to the eyes, for today I will not be doing any eyeshadow. Therefore, I jump right into applying mascara to my top and bottom lashes. I used the L’Oreal Telescopic Mascara. Since I didn’t use any eyeshadow, I used 3 coats of mascara for a longer and thicker effect (apply as many coats as you want). I also applied some highlighter in the inner corners to make the eyes pop even more! Another trick I learnt recently apart from applying highlighter in the inner corners, is to apply a nude eyeliner in my waterline. It will make your eyes look more open and bigger. I used my Essence Extreme Lasting Eye Pencil in the shade 06 silky nude. For brows I used my L’Oreal Brow Artist Designer for light and natural looking brows and then to set my brows I used the Essence Lash and Brow Gel Mascara. For lips I applied the Kiss Proof Soft Lipstick in number 102. To set everything off I used the NYX Dewy Finish Setting Spray.


I hope you found this makeup look useful! This is my go to make up look and it usually takes around 20 minutes so as I said before it’s great for when you are in a rush and still want to apply makeup. I will see you next Wednesday and prepare to get smokier next week 😉

Lots of love,
Nicole x x x

Friday 17 March 2017

Purple Smokey Eyes

Hi everyone, it’s me, Nicole! As promised in the last post, for today I have another make-up look. I hope you’ll love this look as much as I do. I will mainly focus on the eyes for today 😄


I always start with a clean base. That’s a must!! Priming my face using my Eveline Cosmetics Primer, I then go onto the foundation which for today I used my l’Oreal Infalluble 24hr Matte Foundation. OMG this foundation is sooooo good!! It is my favourite drugstore foundation at the moment. It has such good coverage and it stays on for so long without getting cakey. Highlighting with my Maybelline Age Rewind Concealer and also priming my eyes with the same concealer. To sett everything I then used the Rimmel loose powder in the shade Transparent.


So going straight to my eyeshadow, I used the Morphe 35T palette. You will find numbers on the palette which will indicate the shadows I used one after the other. I started with a light purple shadow in the crease as the transition shade and then building it up with a slightly darker colour to intensify the crease. Picking up the third shade, I placed it on the outer corner of my eyes making sure everything was nice and blended! So on the lid I usually put a shimmer colour, but I really wanted this look to stay matte so I took the last shade which is a burgundy colour on my lid. I then finished the look with a winged liner, using my Maybelline Eyeliner Gel in the shade black. For my upper lashes I used my Better Than Sex Mascara by Two Faced and for my lower lashes I used my L’Oreal Telescopic Mascara. Since the wand is much thinner I find it quite easy to apply mascara to my lower lashes without messing my make up rather than using a big and thick wand. After I applied mascara I went straight onto brows - I used my Anastasia Beverly Hills Brow Wiz and my Anastasia Beverly Hills pomade both in the shade Ebony.


For contouring I used my ABH cream contour palette in the shade Medium. Since It’s a cream contour, I love setting it with a powder so I used my NYX Contour and Highlight palette. For blush I used my BH Cosmetics Blush Palette in the shade Glamorous. For highlight, as always, I used the Sleek Solstice palette. I adore this palette, it’s so pigmented and so cheap for it’s price! I've mentioned that in my last post earlier this week since it made it with my top 3 holy grail palettes if you want to check it our here. For lips I used the New Look lipstick in the shade Raspberry. I really do love their new make up range. They have various make up which I find it quite good especially their lipsticks and lip-glosses. Last step to complete this look will be using my Mac Fix Plus and spraying it all over my face.

That’s all for today! Hope you liked this look, let me know in the comments below if you have any requests for me!


Thank you so much and I will talk to you very soon! 😀 Love,
Nicole x x x

Links:
Morphe 35T Palette

Thursday 16 March 2017

Airport Outfit

Hi everyone! Hope this post finds you all well. Before I get into today's post (I feel I always say this!) I would like to thank everyone from the bottom of my heart for the support that you have given the blog and all the lovely comments we have been receiving; both myself & Nicole. We truly appreciate it and we cannot wait to bring you more interesting content! Now let's get into today's post!


As you might know, a couple of weeks ago I was in Vienna & Bratislava with my friends. A couple of hours before the trip I asked Sabrina to meet me at Smart City to take a couple of photos of me with the outfit I was wearing for the travel part of this trip. Today, I decided to share it with you. It's a super comfy outfit and I believe that this type of outfit is key when travelling! For those of you who love travel blogs I might do one very soon either this week or next week so stay tuned for that!

Let's get into the details shall we?


Starting from the trousers, I wore my black ankle-length jeans from Stradivarius. I've been loving the ankle-length jeans lately and I feel that these are the comfiest type of trousers so I decided to wear them to the airport. I paired the black jeans with a black & grey sweater because I wanted to stay warm on the flight and then I threw on my black & white bomber jacket (all the details to the outfit will be found at the end of the post). Finally, I paired this outfit with my white converse and my mauve-pink baseball cap because what better way to hide the curls I didn't manage to straighten than a cap haha?! I also took with me my black bag to put all the essentials I need in it.


That is all for today you guys! Hope you enjoyed this look - let me know what your airport essentials are down below! Tomorrow Nicole's blogpost will go up so make sure you check back on our page!

Take care,
Deborah X

Details:
Black Jeans - Stradivarius
Grey Sweater - Jennyfer
Black and White Bomber Jacket - Forever 21
Baseball Cap - H&M
Shoes - Converse
Bag - H&M


Monday 13 March 2017

Top 3 Holy Grail Palettes

Hi everyone, it's Nicole & my weekly post is finally here! I know it's a bit late but don't worry - I've got another one prepared for you for this week - it should be up on Friday 😉

For today I’ll be reviewing my top 3 holy grail palettes.
The first one that I’ll be mentioning is my forever favourite eyeshadow palette. I’m so in love with it 💓 It’s the Anastasia Beverly Hills Modern Renaissance Palette. I mean, the colours in this palette are so beautiful and the pigmentation .. OH MY GOD. I was immediately drawn to the names and theme. Most of the colours are unique as well. The contrast of the neutrals combined with the richer pinks, reds, and oranges makes for a very exciting range of shades. My favourite colours in the palette are for sure REALGAR which is a smoked orange, VENETIAN RED which is a shimmery Italian pink kind of colour and lastly VERMEER which is a beautiful pink shimmery shade. A little tip with shimmery shadows is to apply a setting spray or MAC Fix Plus on your brush and then dip the brush in the shadow - it will make the shadow so much more pigmented! I love using this technique 💗 Although this is high end product, I do not regret any penny spent!


Shades include:
  • Tempera (matte beige)
  • Golden Ochre (matte light yellow)
  • Vermeer (metallic pink shimmer shade)
  • Buon Fresco (matte antique lavender)
  • Antique Bronze (metallic satin )
  • Love Letter (matte raspberry)
  • Cyprus Umber (matte dark coffee)
  • Raw Sienna (matte neutral amber)
  • Burnt Orange (matte deep orange)
  • Primavera (metallic shimmery gold)
  • Red Ochre (matte sienna)
  • Venetian Red (matte cerise )
  • Warm Taupe (matte light grey)
  • Realgar (matte smoked orange)
Top row swatches

Bottom row swatches

The obsession is real you guys.

Next up is the Sleek Highlighting Palette in the name of Solstice. This an affordable palette which gives a luminous finish to your skin when applied. As said earlier before I love using fix plus again before applying this to your face. Highlighting is basically bringing forward all the high points on your face - where the light hits your face. Highlighting your face brings it to life. You can apply highlighter on your cheekbones, bridge of the nose and tip (I personally love putting a dot of highlighter only on the tip to make the tip of my nose more lifted), cupids bow and inner corner of your eyes. If you want to read more about Contour and Highlight you can read Deborah's post where she talks all about contour & highlight. Check it out here!


These are the four shades in this palette:
  • Ecliptic (cream light rose pink colour)
  • Hemisphere (pinky lavender with a luminous glow)
  • Subsolar (light yellow with warm undertones and a pearly glow)
  • Equinox (light-medium peach with warm undertones)

Lastly Is the NYX Highlight and Contour Palette. It has 8 different shades; 4 highlights and 4 contour shades. I only use the contour shades since I didn’t quite find the highlighting colours that interesting although they are very good for a day time glow and a more natural and light glow. However, the Contour shades are really good! It’s basically good for every skin tone. When purchasing a contour palette I always look for a more grey tone colour in the palette. A grey colour helps to make a more natural contour rather that having a dark contour. I like them both but for every day contour I like applying a more grey-ish colour.


The shades found in this palette are:
  • Ice Queen (pearly shimmer highlight)
  • Soft Light (nude matte shade)
  • Cream (yellow matte shade, which can be used as a banana powder too)
  • Nectar (light-medium peach with warm undertones)
  • Tan (matte soft brown with red undertones)
  • Toffee (matte neutral brown)
  • Sculpt (matte soft brown with a grey overtone)
  • Hollow (matte deep brown) 


I hope everyone got something useful out of this post! Thank you so much for your support!

Love,
Nicole xoxo

Links:
Anastasia Beverly Hills Modern Renaissance Palette
Sleek Highlighting Palette
NYX Highlight and Contour Palette

Friday 10 March 2017

Review: CHI Rose Hip Oil - Protecting Shampoo & Conditioner

Hi dolls! FINALLY the weekend is here 😍 I had such a busy week BUT I had a very exciting meeting last Thursday regarding a huge project I will be sharing with you on the blog in a couple of week's time! Stay tuned 😉

Today I promised you to get up another review, this time it is from the brand CHI. Firstly I would like to thank CHI Malta for sending me some of their products to try out and review. To be 100% honest with you, I was a bit skeptical to try out new hair products for the simple reason that I like to stick to the ones I have and don't really change. I have been using L'Oreal products for quite a while now as was suggested by my hairdresser as my hair (naturally super curly) used to get so tangled ! But I decided to give these two products a try and I'm so glad I did.


Before I get into the review part I am going to give you a brief about this range. The Rose Hip Oil range comes with 6 products in total:
  • Protecting Shampoo
  • Protecting Conditioner 
  • Repair & Shine Leave-In Tonic
  • Dry UV Protecting Oil
  • Dry Shampoo
  • Recovery Treatment
The key ingredients in this range are: Rose Hip Oil which helps in preventing colour fading, Silk which helps to strengthen and protect the hair's cuticle, Vitamin C & Antioxidants which rejuvenates the hair and offers an intense shine boost and a UV Protectant which protects against the harsh UV rays that fade and dull hair colour.

Protecting Shampoo


''Gently cleanse colour-treated hair while preserving tone and intensity. Rose hip oil, vitamin C and antioxidants prevent colour loss while increasing shine and vibrancy.''

My thoughts...
My hair is naturally the colour you see it in the photos and posts but I do have caramel dip-dye although I've done it over a year and a half ago so I only have a few pieces that are still in the caramel dip-dye shade. However when I applied the shampoo it felt so smooth and it really helped with preserving the caramel shade. And can we please talk about the smell of it? It honestly smelled like I was bathing in a bath full of rose petals 🌷 What more do you need in life?!

Protecting Conditioner


''Restore moisture into colour-treated hair to eliminate dull and dry hair. Vitamin C revitalizes for added radiance and shine.''

My thoughts...
I know I've tried a great conditioner when I actually manage to brush my hair after I've washed it. I've had so many problems with tangles and my brush literally getting stuck in my hair that there was a time that I thought there was no hope for my hair! Thankfully, I managed to tame it slightly!! This conditioner really helped with eliminating any tangles I had in my hair and it made my hair super smooth and so much easier when I later started straightening it since there weren't any tangles!

If you have any other questions you'd like to ask you can either message our page or else you can contact CHI Malta directly on their Facebook page or you can also try visiting their website

Happy weekend & I'll see you all next week beauties!

Love,
Deborah X

Follow us on our Social Media:
Facebook
Instagram
Twitter

Check out the March blog posts so far!
Review: Arad Dead Sea Malta - Fluffy Body Mousse
How to: Contour & Highlight
Review: Arad Dead Sea Malta - Facial Hydro Mousse
Soft Berry Tones - Spring Appropriate Makeup


Wednesday 8 March 2017

Soft Berry Tones - Spring Appropriate Makeup

Hi dolls! Hope you've started the week on a positive note and that you're all enjoying the blog posts I am uploading 😄  I want to say a huge thank you to everyone who read last Sunday's post of How to Contour & Highlight - it was very well received 💗 If you would like any tips or 'How to:' of any other current trends at the moment whether fashion related or beauty related please let me know in the comments below! I'd love to hear from you.
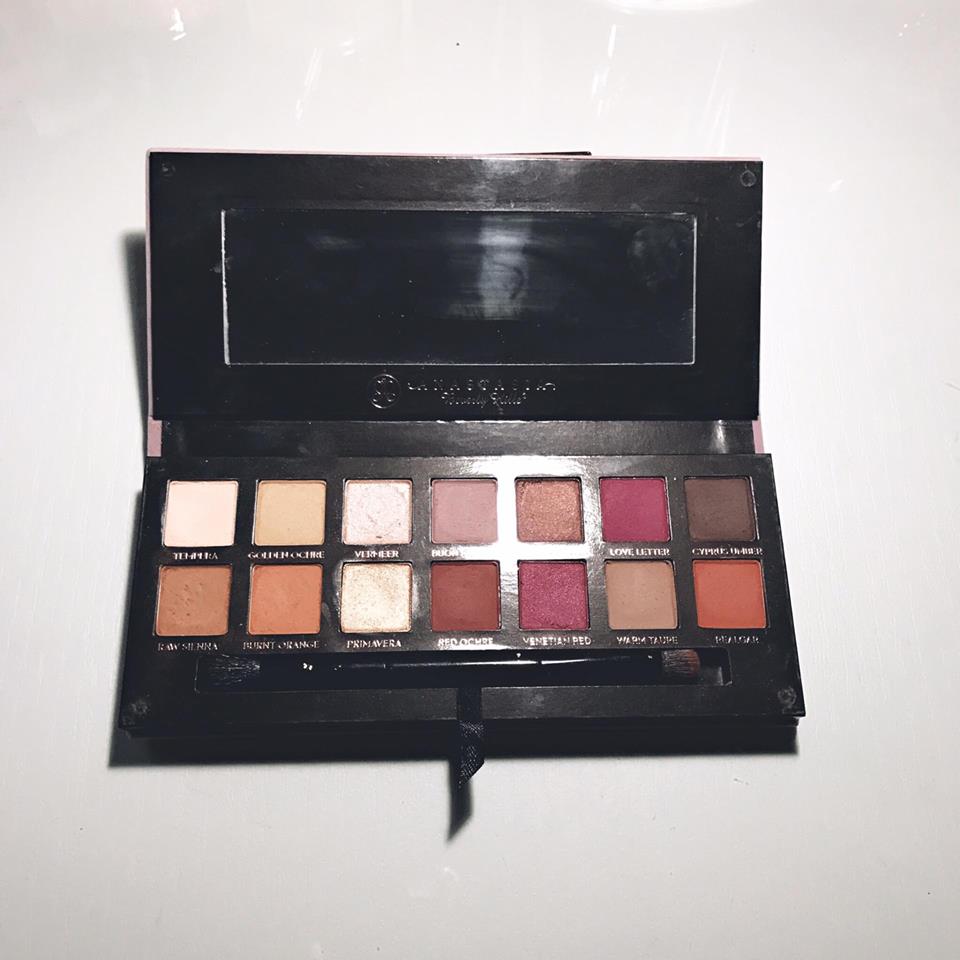
Today's post is a soft berry toned makeup look which is perfect for the upcoming spring weather. I will be using the Morphe 35F palette which I recently got hold of. I will only be focusing on the eye look and the lipstick shade but if you want me to do a full face routine or a foundation routine, let me know because I'd love to do that! Okay, let's get started!!


I first started this look by first applying a beige/white shade all over my lid. I like to apply this so that it acts as a base for the rest of the shadows. I like to slowly build the intensity of colours that are quite vibrant. I first applied the 2nd shade from the 3rd row of the palette which is a shimmery pinkish-purple shade and applied that to the outer V of my eyelid. Using the same fluffy brush I picked up the 6th shade of shimmery purple from the same row and blended this shade together with the previous shade.


To intensify the berry tone I applied the first shade from the 4th row which is a deep shimmery purple and used a denser fluffy brush so that the colour can be intensified even more. You can also use Fix Plus or Setting Spray, spray it on your brush and then dip the brush into the shadow - you'll have a gorgeous shade of purple ❤ I blended everything out until everything was completely smooth.

Finally, I applied a mix of the matte mauve shade (5th shade, 3rd row) and the shimmery pink shade at the very end of the 3rd row - focusing only on the middle part of the eyelid. For the inner part of the lid I used the very lightest shade in the palette (1st shade in the 1st row) and applied that to the inner parts of the lid as well as the inner part of the tear duct to brighten the eye.

I grabbed that same dark shade of the deep shimmery purple and applied that under my lower lash line to compliment the rest of the eye makeup. For the lips I used the Sleek Matte Me liquid lipstick in the shade Bittersweet 1036. That is it! Super easy right?


Let me know what you think of this makeup look and whether you liked it or not!

Special thanks go to Jessica for being oh so patient with me and helping me out in yet another great blogpost and Sabrina Sacco for her amazing photography skills and for capturing all the plans and ideas I had in mind to actually something that you guys can read and see! Thank you ladies 😘

I will most likely have another review up later on this week so stay tuned!

Take care,
Deborah X

Links:
Morphe 35F Palette - CultBeauty
Sleek Matte Liquid Lipstick - Melita Health and Beauty, St.Julians

Monday 6 March 2017

Review: Arad Dead Sea Malta - Facial Hydro Mousse

Today I will be sharing with you another review from the brand Arad. This time I will be talking about the Facial Hydro Mousse Self Foaming Cleanser. I have already uploaded a review from this brand on another product that is the Facial Hydro Mousse which you can read here. As usual, first I am going to tell you what this products promises to do for you.

''Rich stable soap-less foam for quick and convenient cleansing of face and neck from skin impurities and make-up. Suitable for all skin types, due to gentle formulation...''

To use this product all you have to do is ''apply foam to your hand and message in circular movements [wet face]...'' Then you simply rinse with water!


My thoughts...
I normally use makeup-remover wipes to use this product however I decided to give it a go! Now I know that although it doesn't tell you anything on the bottle with regards to using it on your eyes; I knew it would probably not be the best idea but I decided to try anyways! So last Sunday I had a friend's birthday party and I decided to test it out that night. I had on a full face of makeup with foundation, contouring, eyeshadow, liquid liner and mascara. I applied it all over my face and even on my eyelids and gently rubbed to help remove the makeup and dirt off my face. Although it did sting a little (on my eyes), as soon as I rinsed off the product off my face I was perfectly fine! Just be careful if you decide to use it on your lids. I was super happy with the result as I didn't need excessive rubbing to remove my makeup especially with regards to the eye makeup and I was very pleased with it despite the slight stinging I felt. When I use makeup remover products on my eyes I find myself scrubbing harshly and ending up with red eyes. With this product I didn't have to do that which is why I love it! I'll insert a photo below of myself with and without makeup (after using the product) so that you can be your own judge. And yes, I was wearing my pink pyjamas!!


If you have any questions on this product or any other product from Arad or would like to know from where you can purchase these products you can either message us on our Facebook page or else message Arad Dead Sea Malta Facebook Page. You can also check out their website for further details.

See you soon & have a great week!
Deborah X